If you ever ask a recordist if they have ever worried about wind, and their answer has been “No,” then please send me their details, because they must have found the Holy Grail of solutions to one of the biggest serial killers of pristine sound recordings; wind. And I’m not talking about the massive weather systems that bring large helpings of misery to those living in places like Japan, the Philippines, India, China and the US. I’m also not only talking about those souls that brave inclement weather to capture sound exclusively. Anyone who uses common types of microphone (i.e. condenser or dynamic), be it a lav mic, a shotgun, ambisonic, stereo or mono, it doesn’t matter, wind will find you; inside or out.
The vast majority of microphones fall into either of the previously mentioned camps. Further, condensers are much more commonly used in field recordings BECAUSE of their sensitivity, frequency response and transient response whereas dynamics are used mainly when their lower sensitivity can be an asset; like reducing room reverb pick up or for recording really loud sounds like gunshots, engines, and drums. Of course there are other types of mics in use like ribbon, piezoelectric, carbon (rare), Micro-Electro-Mechanical Systems (MEMS) and the list goes on. However, condensers and dynamics are by far the most common.
With that in mind, let’s take a brief look at how condenser and dynamic microphones works just for *fun*.
This field recordist workhorse works by way of an electrically charged diaphragm and a backplate. The diaphragm is positioned close to the backplate with only a small gap between them. When sound waves hit the diaphragm, it vibrates, causing the distance between the diaphragm and backplate to change. As the distance changes, the capacitance (electrical charge) between the diaphragm and backplate also changes. This variation in charge produces an electrical signal that mirrors the incoming sound waves. The electrical signal is then amplified and processed to create the audio output. And, “voilà” and a tasty addition to your project has been captured!
A dynamic microphone works with the magic of electromagnetic induction. It has a diaphragm attached to a coil of wire placed inside the magnetic field of a magnet. When the sound waves of whatever you’re recording bump into the diaphragm, it moves within that magnetic field, causing the coil to move as well. This movement of the coil produces an electrical current (voltage) through electromagnetic induction, which is directly proportional to the sound waves’ vibrations. The resulting electrical signal is sent through the coil and transformed into an audio signal that can be amplified and reproduced. Once again, “bingo” your podcast has assumed a worldly form.
As with everything, choosing the right type of microphone depends on the situation. A topic for another time. I will say that two of the main reasons my microphone cabinet hosts mainly the condenser variety is because of frequency response, transient response and sensitivity. That simply means they are *better* for capturing higher and lower frequencies; better at reproducing the intricacies in sounds more faithfully; and don’t need massive gain to collect even the most insignificant of sounds… a blessing and a curse let me assure you.
But regardless of the type, they both suffer from the ravages of wind… listen to most of your favorite YouTubers who often use the excellent Shure SM7B. Despite the robust design, plosives (the “pop” sounds that result from letters like “p” shooting a small blast of air directly into the capsule) are still commonplace… and, alright, I’ll say it… freaking annoying!
So, what are we to do with all this wind?
That’s a question I tend to ask myself when trying to record the wind’s effects directly. As it happens, way back in… I forget the year… maybe 2007… I headed out into a typhoon to see just what was possible. And I discovered something that I do need to remind myself of constantly. The component of high winds that really make them an impressive force of nature is less about the sound – although sound is a huge part – and more about the visceral experience of being there. The sensation of being blown around, the visual clues of wind speed, the blasting rain in your face and the distortion in your own ears.
It blows my mind every time I see this, but I wish they had figured out a way to get better sound… I’ll have to watch the movie to see if they did. This was a situation where inside the vehicle, wind wasn’t really the issue through its direct influence on the mic. Rather, the insane sound pressure levels of the storm tearing up the countryside claim that responsibility. Thinking “aloud” here, but I wonder what impact rapid air pressure changes have on a microphone’s performance? I might have to do some research. Regardless, the experience would have been tenfold more incredible sitting in the vehicle. It is a not-so-secret dream of mine to do just that… someday.
For most people, doing stupid sh!t like going into a cyclone, isn’t where their wind troubles occur. And so, edge cases aside, there are four main ways to tackle wind on its own turf: foam windshields, foam plus (fake) fur hybrids, zeppelins/blimps/baskets and blimps with windjammers (again, a fake fur outer). In the recording below, you can hear what a decent wind protection system can do for your recordings in even the most extreme weather conditions… tornados aside.
Before we look at the differences, it is important to note that in 99% of cases – a figure I just made up – some sort of “middle-finger-to-the-wind device” is necessary. Even on calm days, with the presentation of a naked mic *gasp*, that sneaky bstrd will manifest itself at the least opportune time to “whisper” into your mic like a drunken friend who thinks they’re discreetly informing you they might have needed to take a rest stop five minutes ago and are now sporting a fashionable new dark spot on their equally fashionable jeans. And as anyone who watches videos recorded outside knows, a huge number of said videos have that overpowering rumble produced by wind sticking its fat fingers in the mic’s capsule and giving it a poke.
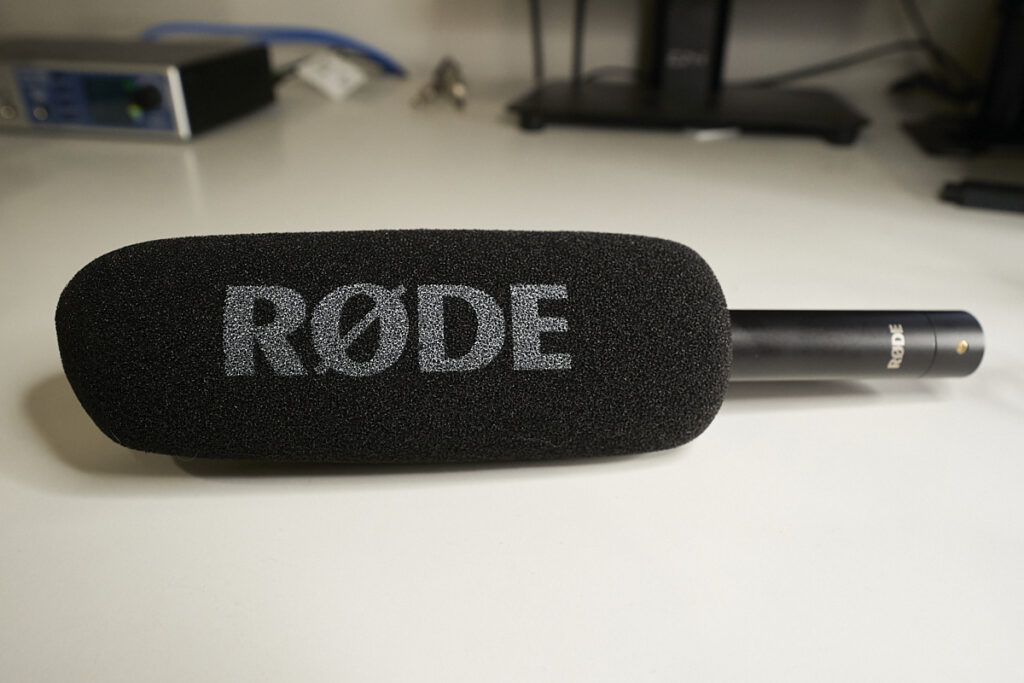
The trust ol’ foaming that you see in all sorts of scenarios. Limited protection, but better than nothing!
Usually a slip-on variety that lovingly embraces your mic in a foam covering to interrupt the winds incessant designs on your recordings.
Use case? Very light wind conditions. Primarily used indoors for pop protection and stopping people spitting on the mic… probably accidentally. Outdoors, only the mildest of wind conditions will be warded off. And, like many things in this world, it depends. In this case, it depends on the mic’s susceptibility to wind. Shotgun mics using interference tubes are a good example of devices highly susceptible to wind. These foam covers are the lowest rated for wind protection. Cheap and easy to use.
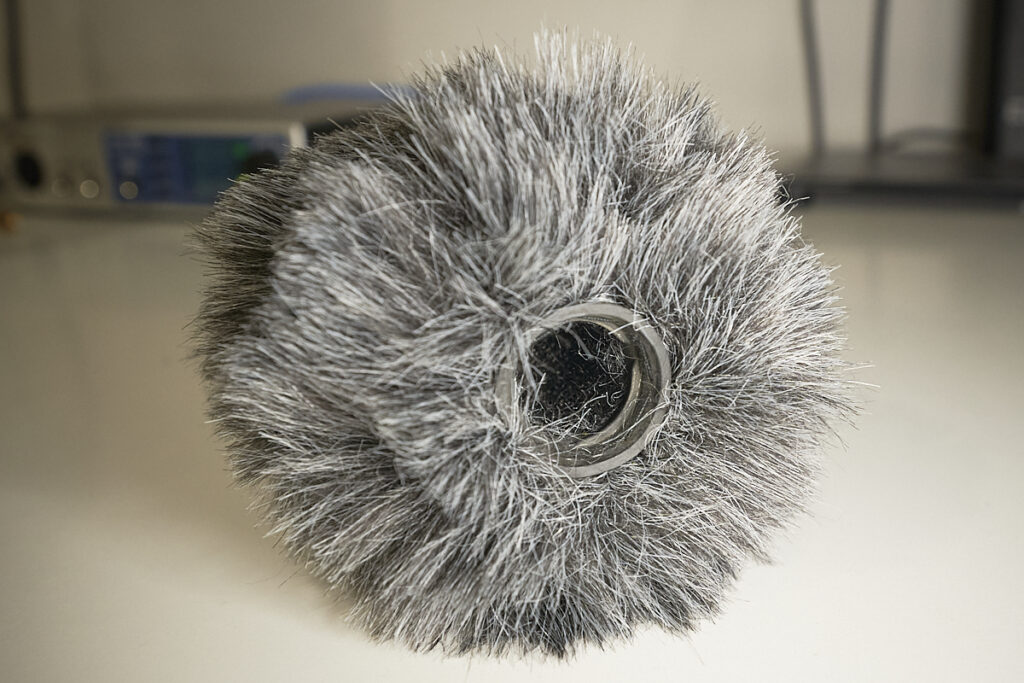
Foam with fake fur outer:
A little hard to see, but maybe you can glimpse the foam layer inside.
The fur on these increases a mics armor through aerodynamics and diffusion. The fur creates turbulence in the wind which diffuses it before it reaches the sensitive capsule.
Use case? Often seen in use by news reporters, vloggers, YouTubers, etc… who are outside in light to moderate wind conditions. They’re still relatively cheap and easy to use.
All shapes and sizes, like this NT-SF1 Ambisonics mic in the *Ah-hem* Baby Ball Gag… I’m not sure they through the naming convention on that one. Some specialized set-ups need a little lateral thinking… like my Lewitt setup.
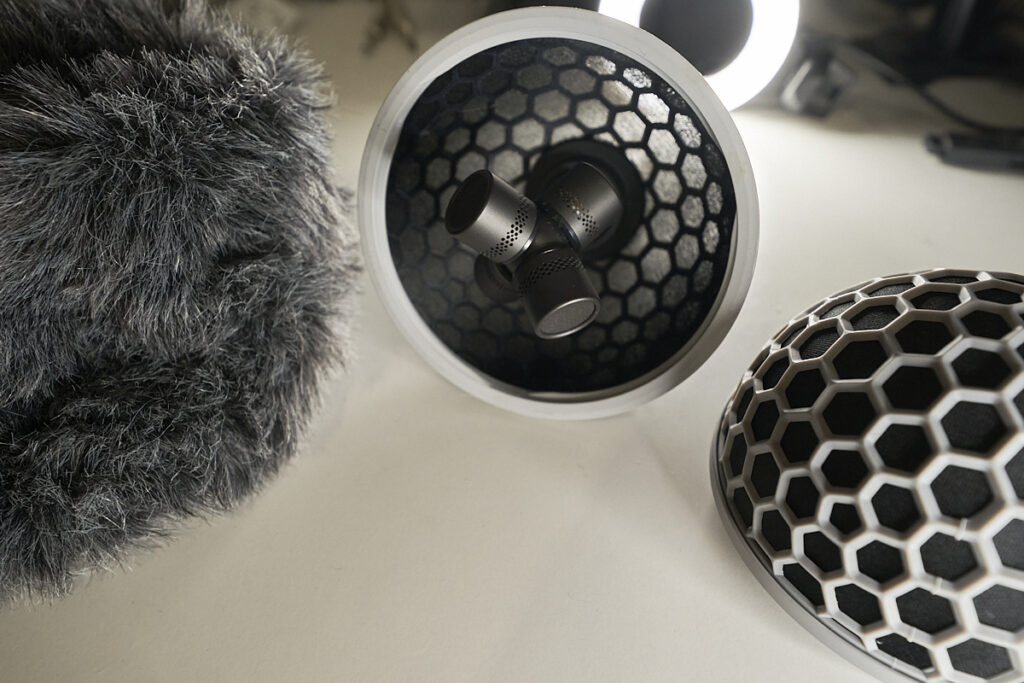
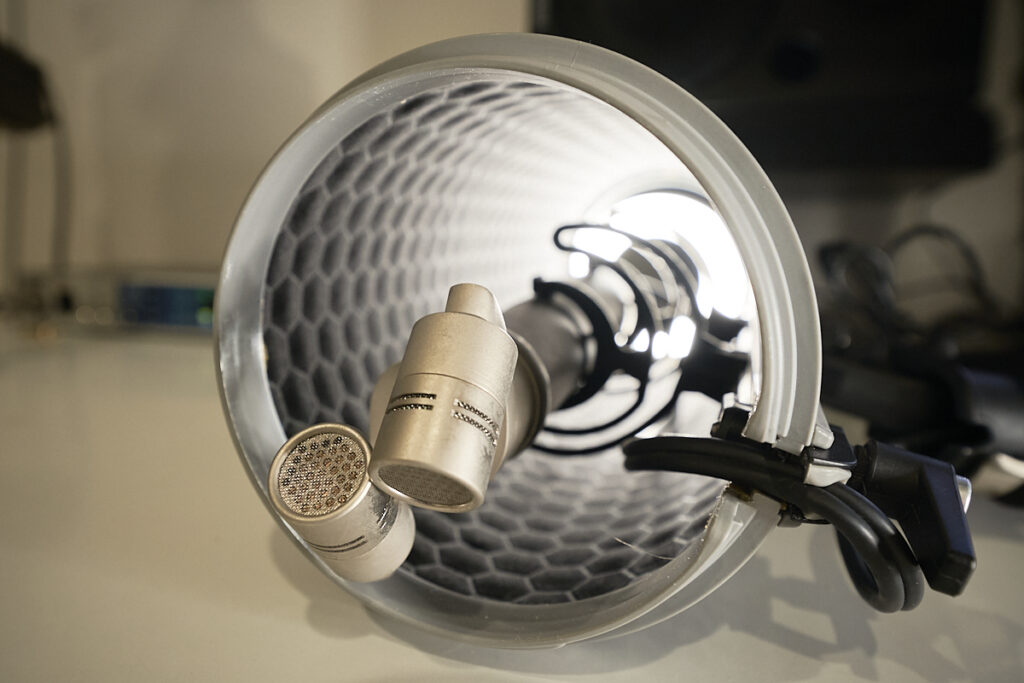
Now we’re getting somewhere in our fight against wind. However, there is a BIG elephant in the room here… do elephants come in any other sizes, relatively speaking? Whilst the traditional blimps were effective at keeping audio clean with good sonic transparency, they came with a price tag more expensive than a lot of medium range mics. Not only that, they are bulky and fiddly to set up with the internal suspension module requiring the operator to remove the internals to fit the mic and run the cable. The suspension system is a vital component as it drastically reduces the handling noise by essentially separating the mic from vibration channels. Crucially, blimps create a dead space around the mic. Your favorite recording instrument sits in its own little bubble of wind-free existence. Yay!
There are budget-er options these days with clones of Rycote’s original design readily available. Your mileage may vary with these, however. You have been warned.
These older designs are fiddly to use in the field as the whole suspension assembly has to be removed for mic placement or maintenance.
With Rycote’s latest system, the Cyclone, performance has increased, but so has the price. Granted, it is an engineering marvel. Depending on your desired mic configuration – mono, stereo, Mid-Side (MS) or Double Mid-Side (DMS) – prices can range anywhere from around the $700 USBuckeroos to well over $1,000. And that is before you add a furry windjammer into the mix. The Cyclone has a much improved user experience for mounting the mic(s) as the basket can be opened with the push of a button to release the magnet lock.
Use case?
Much stronger wind conditions. Think blustery days by the ocean. The older versions are fiddly to use, while the Cyclones are incredibly easy. Of course they are still much bulkier than a windshield you can literally stuff in your pocket. But what you lose in portability, you gain in protective performance.
And a little note regarding the budget versions of Rycote’s original design. As you can see in a lot of the pictures I post on this site, I still use a pair of knock-off blimps to house the Lewitt 540’s for ambience recordings. I bought these partly because I thought I would have to do some “modifications” (hackery) for my intended use case and partly because, as mentioned, the Cyclones aren’t cheap or easily adaptable to my slightly unorthodox methodology. The truth is, my set-up is bulky – considering the 540’s relatively compact nature – and a pain in the behind to lug around. BUT, they work great. So, don’t be fooled. You can make just about anything work given a little thought and some ingenuity.
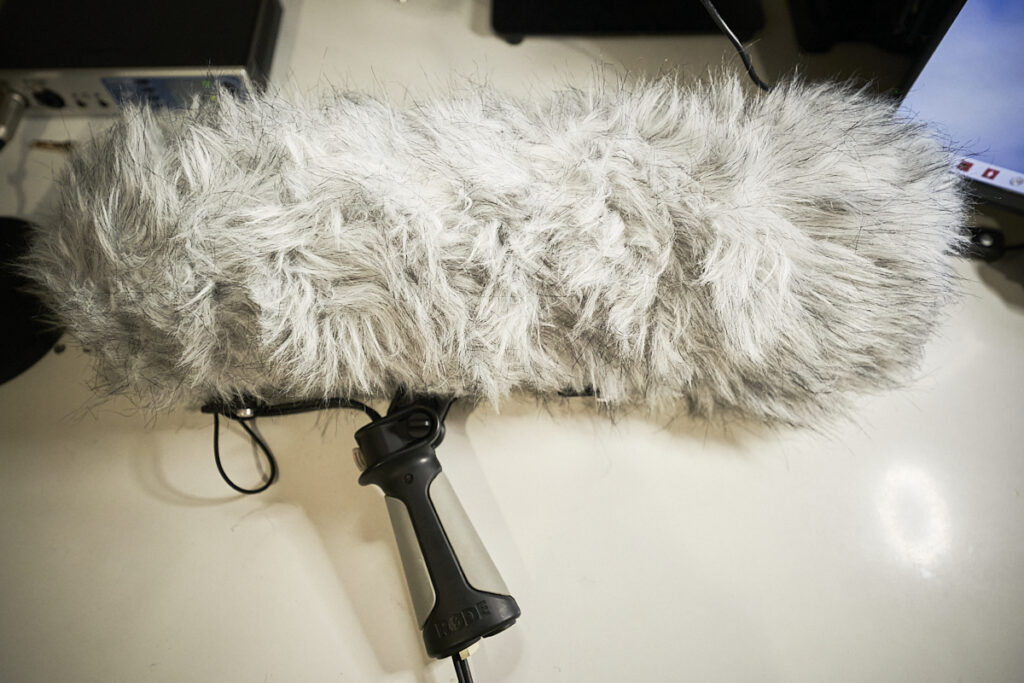
Zepplin/blimp/basket with Windjammer:
Single blimp with a stereo mic inside. Furry attached for maximum effectiveness.
The same as above but with much improved performance in really bad wind conditions. The windjammer is a two layer design with mesh on the inside and fake fur on the outside. Not only does the fur covering increase the system’s attenuation abilities, but adds a layer of protection against water. It is by no means waterproof, but certainly helps in rainy conditions or where sea spray might be an issue. Another issue to consider is unless a condenser is designed for the kinds of humidity that are often found outside the studio environment – that is they are RF-biased (Radio Frequency Biased) – they CAN be prone to artifacts due to the interference water particles have on the capacitance inside the capsule. When I started my field recording journey way back when, Rode NT4 stereo mic in hand in Malaysia, I experienced the pops and crackles that this non RF-biased mic can experience in humid conditions… Malaysia… on a beach… yeah. However, it is nearly impossible to judge when this will occur and I came away with some fantastic recordings. I also came away with some real duds. The Lewitts I commonly use now are also non RF-biased and, knock on wood, have performed spectacularly; even in the depths of a Japanese summer… in a rain soaked forest… near the ocean. Being inside a fur wrapped blimp may have something to do with that. Maybe.
Use case? Well, here’s the thing, you can use a windjammer in all sorts of situations to protect your recordings; from zero wind (massive overkill) to blizzard conditions. You might need to position the mic in such a way that, aerodynamically, the blimp is performing its best. Trial and error will soon tell you where the best positioning is. There is one other thing to consider. Despite the improvements in material science over the years, adding layers around your mic does have an impact on sound; namely in the higher frequencies. A good rule of thumb is to judge the environment and then decide whether or not you need the jammer. In my case, and due to the microphones I predominantly use for nature’s soundscapes, I more often than not opt to layer up. That is unless the conditions are quite calm. The top tier models from Rycote are quite the investment, however. But there is a strong case to be made for ensuring your best chance of success when you have spent considerable time and money getting to a location. Coming away with a sack full of rumbly, unusable sound files or even files that MIGHT be salvaged after processing (more time invested) is a frustrating and wasteful experience. Unless you chalk it up as a learning experience, that is. And again, there are cheaper varieties that can do a pretty decent job so you don’t have to go into debt to get excellent recordings in challenging conditions.
And with that, let me bid you a momentary farewell until next time. All the best and remember, just get out there and try something even without the latest and greatest gear. Adversity is the greatest teacher and if it’s one thing humans are good at, it’s problem solving.
Recorded in the forest of Gifu as the typhoon was winding down. It was still pretty impressive and I was lucky to to get schmacked by falling tree limbs. This version is MP3 but Time Machine Vol 4 has a much better version. Remember the Time Machine Series is completely FREE!
Check out the libraries below!